Steps for Setting The HTTPSessionCloneId WebSphere

Setting The HTTPSessionCloneId websphere
Navigate “Web servers > webserver1 > Plug-in properties”. Click the view button beside the Plug-in configuration file name (plugin-cfg.xml). In the Plug-in configuration file content, check for the text block of the ServerCluster tag with two servers in the cluster (similar to the one given below). The text block would vary depending on the number of servers in the cluster and the WAS name & host name of the servers and the WAS cluster name. Note down the CloneID corresponding to the servers and click OK.
<ServerCluster Name="cluster1" CloneSeparatorChange="false" LoadBalance="Round Robin" PostSizeLimit="-1" RemoveSpecialHeaders="true" RetryInterval="60">
<Server Name="server1" CloneID="119202204" ConnectTimeout="0" ExtendedHandshake="false"
LoadBalanceWeight="10000" MaxConnections="-1" WaitForContinue="false">
<Transport Hostname="was2201.systems.com" Port="9080" Protocol="http"/>
<Transport Hostname="was2201.systems.com" Port="9443" Protocol="https">
<Property name="keyring" value="/opt/IBM_ND/WebSphereND/Plugins/etc/plugin-key.kdb"/>
<Property name="stashfile" value="/opt/IBM_ND/WebSphereND/Plugins/etc/plugin-key.sth"/>
</Transport>
</Server>
<Server Name="server2" CloneID="119191538" ConnectTimeout="0" ExtendedHandshake="false"
LoadBalanceWeight="10000" MaxConnections="-1" WaitForContinue="false">
<Transport Hostname="was2202.systems.com" Port="9080" Protocol="http"/>
<Transport Hostname="was2202.systems.com" Port="9443" Protocol="https">
<Property name="keyring" value="/opt/IBM_ND/WebSphereND/Plugins/etc/plugin-key.kdb"/>
<Property name="stashfile" value="/opt/IBM_ND/WebSphereND/Plugins/etc/plugin-key.sth"/>
</Transport>
</Server>
</ServerCluster>
NOTES:
a. The hostnames, was2201.systems.com and was2202.systems.com, are the two servers under cluster name cluster1 environment, with WAS names as server1 and server2 respectively.
b. The variables which may (name, hostname and CloneID) or may not (Port numbers) vary from one server to another.
For each of the listed servers, perform the following steps:
1. In the left hand side menu:
a. Click the [+] sign beside the Servers menu item to expand and view its submenu.
b. Click the Application servers sub-link.
The Application servers screen appears.
2. In the Application servers screen, under the Name column, click the server2 link.
In your setup the server2 name could be different, please change accordingly
The Application servers > server2 screen appears.
3. In the Application servers > server2 screen:
a. Under the Configuration tab (Container Settings section), click the [+] sign beside the Web Container Settings section to expand and view its submenus.
b. To configure the Web container, click the Web container link.
The Web Container screen appears.
4. In the Web Container screen, under the Additional Properties section, click the Custom Properties link.
The Custom Properties screen appears.
5. In the Custom Properties screen, click the New button.
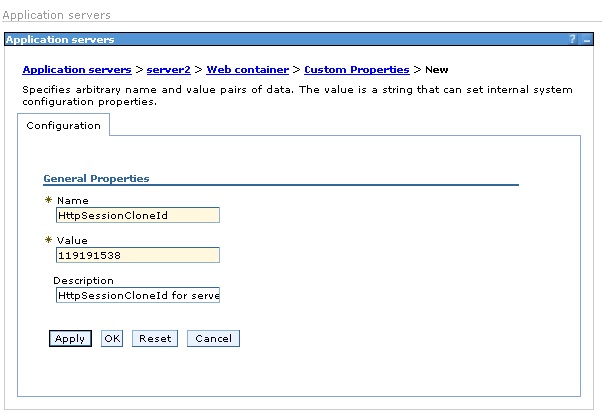
The New Configuration screen appears.
6. Perform the following in the New Configuration screen:
a. In the Name field, enter
HttpSessionCloneId
(as is).
b. In the Value field, enter the unique CloneID corresponding to this server we found in the plug-in configuration file. In this case, it is typed as 119191538 (We had typed in 119202204 as value for server1).
c. In the Description field, enter a description of your choice for easy recognition. For example, HttpSessionCloneId for server2.
d. Click the OK button.
The Messages section, with the Save link appears in the next screen.

NOTES:
a. Both name and value are case sensitive. Therefore, care needs to be taken while entering the same.
b. Make sure the mapping of the server and its CloneID is the same as in the plug-in configuration file.
7. In the Messages section, click the Save link.
The Save screen appears.
8. In the Save screen:
a. Select the Synchronize changes with Nodes checkbox.
b. Click the Save button.
The Synchronize changes with nodes screen appears.
9. In the Synchronize changes with Nodes screen, the current status of the nodes being synchronized appears. Wait for the process to complete and click the OK button.
The Custom Properties screen appears.
10. In the Custom Properties screen, verify that the name HttpSessionCloneId and its value are listed in this screen.
This is a sample picture of the Custom Properties screen.
11. Restart the application server.
— Repeat these steps for all the servers in the nodes.
In case of any ©Copyright or missing credits issue please check CopyRights page for faster resolutions.