Websphere JDBC provider And J2C Alias

1. To create a Websphere JDBC provider, log into the WAS administrative console and click on the JDBC Provider link in the JDBC category of the Resources section, located in the left-hand panel of the administration console, as shown below:
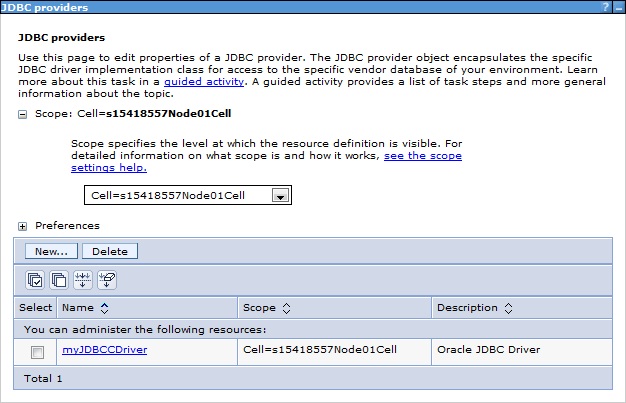
 2. Choose an appropriate scope from the Scope drop-down pick list. Scope determines how the provider will be seen by applications. We will talk more about scope in the JNDI section. For now, please choose the Cell scope, as seen in the following screenshot:
3. Click New and the new JDBC provider wizard is displayed, as shown in the following screenshot:
4. Select the Database type as Oracle, Provider type as Oracle JDBC Driver, Implementation type as Connection pool data source, and Name for the new JDBC provider. Enter MyJDBCDriver as the provider name, as seen in the previous screenshot. We also need to choose an Implementation type. There are two implementation types for Oracle JDBC Drivers. The following table explains them:
Connection pool data source :- Use Connection pool data source if your application does not require a connection that supports two-phase commit transactions.
XA Datasource :- Use XA Datasource if your application requires two-phase commit transactions. Two-phase commit transactions allow a transaction to be rolled back in the event of a failure, allowing an application to handle this event and act accordingly.
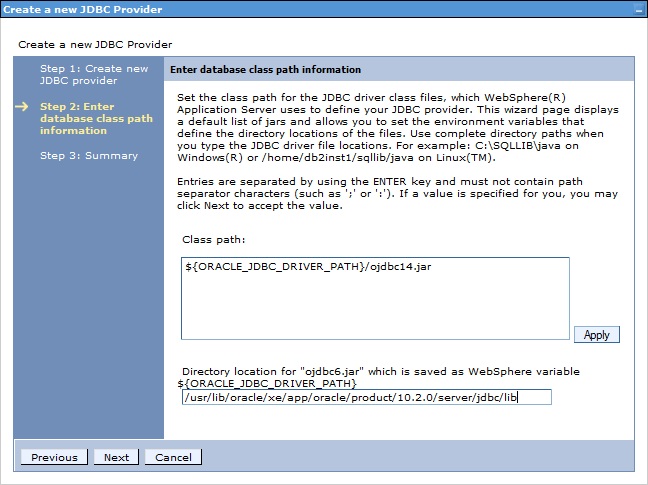
5. Click Next to go to the database class path screen.As shown in the following screenshot, enter the database class path information for the JDBC provider. It is important to note that, by default, WAS has used a JAR file called ojdbc6.jar.
6. Change the Class path field to read ${ORACLE_JDBC_DRIVER_PATH}/ojdbc14.jar. The reason we need to do this is because WAS 8 knows about the latest version of the JDBC driver used in communicating with the full version of Oracle and it is preset as such. We have used OracleXE, which provides an older version of the JDBC provider and so we need to change the default JDBC driver, as suggested by the wizard.
7. Click Apply to ensure that WAS remembers the driver Class path field change:
8. As long as you have installed Oracle XE using the default paths, you will be able to use the following path in the Directory location field: /usr/lib/oracle/xe/app/oracle/product/10.2.0/server/jdbc/lib
9. Click Next to proceed to the next step, where you will be presented with a summary, as shown in the following screenshot. Review the JDBC provider information that you have entered and click Finish.
Since WAS 8.0 is the latest version of WebSphere Appication Server, the wizard already knows about the new version of the Oracle 11g JDBC Driver. We are connecting to Oracle XE 10g and the driver for this is ojdbc14.jar. The classpath file can contain a list of paths or JAR filenames which, together, form the location of the resource provider classes. Class path entries are separated by using the Enter key and must not contain path separator characters (such as “;” or “:” ). Class paths can contain variable (symbolic) names that can be substituted using a variable map. Check your driver installation notes for specific JAR file names that are required.
10. You will now be prompted to save the JDBC provider configuration.Click Save.
When configuration changes are saved, WAS updates the underlying XML files which contain configuration settings.
11. Once you have saved the JDBC provider configuration we have just run through, you will be returned to the JDBC providers screen where you will see the new provider listed, as shown in the following screenshot:
 We now need to set up an authentication alias which will contain the username and password for communicating with the Oracle Schema.
Creating a J2C alias
If a database has security enabled, which is the case for most RDBMS, we will need to somehow provide the username and password for the connection. By creating a J2C alias, we can create an authentication resource, independent from the provider and data source. Using this approach, we can change the alias if the database username and password are changed without reconfiguring the provider or data source. This is a key concept and WAS provides levels of abstraction to allow the configuration of resources independently from each other. So, it can be said that the JDBC Provider, data source, and J2C alias are loosely coupled. This concept also allows the application to access a database though a JNDI lookup and the application does not need to know the database username and password.
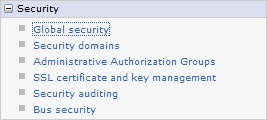
1. To create a J2C alias, navigate to the Security section in the left-hand navigation panel and click on the Global security link:
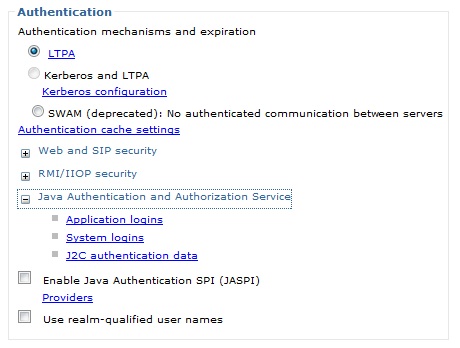
 2. Expand the Java Authentication and Authorization Service category in the Authentication section, found in the bottom right-hand side of the Global security screen.
3. Click on J2C authentication data, as shown in the following screenshot:
4. You will be presented with a screen where you can click New to create a new J2C authentication alias. Enter oraadmin for the Alias, enter oraadmin for the User ID, and oraadmin for Password, as shown in the following screenshot:
here oraadmin and same is used as oracle userid and password. change it according to your requirement.
5. Click Apply and then Save. A new alias will be created, as shown in the following screenshot:
Reference this J2C authentication alias when we create our data source.
In case of any ©Copyright or missing credits issue please check CopyRights page for faster resolutions.


