Create DataSource In WebSphere 8

Once we have created a provider and authentication alias, we need to create an actual JDBC data source which an application will use via JNDI to access the HR database. In the next steps, we will use the administrative console to create a new datasource in websphere 8.
1. Open the Administrative console and navigate to the JDBC section in the left-hand side panel and click on Data sources, as shown in the following screenshot:
 2. Select the Cell scope and click New, as demonstrated in the next screenshot:
3. You will now be asked to fill out the data source information.
4. Enter the value HRDataSource in the Data source name field and the value jdbc/hrdatasource in the JNDI name field, as shown in the following screenshot:(Change datasource Name if you have something different)
5. The JNDI name provides a naming context for the data source, as used in resource lookups by application code. Click Next to move on to the next screen where you will be asked to select a JDBC provider for your data source. Select the JDBC provider that we created previously, as seen in the following screenshot:
6. Click Next, and in the following screen, enter into the URL field the following connection string, jdbc:oracle:thin:@<host_name>:1521/xe.
Please replace the <host_name> component with your appropriate server’s IP address or hostname.
7. The JDBC connection string we are using in our example is an Oracle thin client URL. This allows WAS to connect to Oracle via a URL, which is made up of the following syntax: <driver_type>:@<host>:<port>/<service_name>. It can be broken up as follows:
<driver_type> = jdbc:oracle:thin
<host> = node01waslocal.com (the IP address or host name of your Linux machine; it could even be localhost, if Oracle is installed on the same machine as WAS)

<port>=1521 (default Oracle listener port)

<service_name> = xe (the Oracle instance and service name)
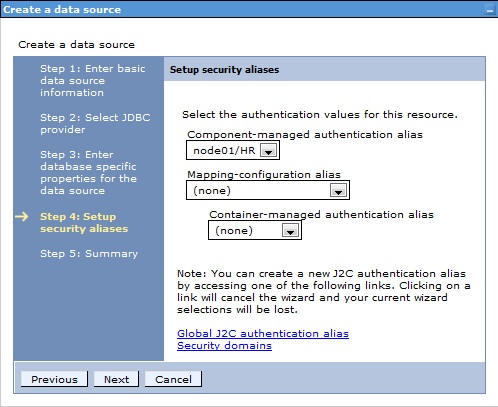
8. Click Next to set up a security alias. In this screen, there are several fields.
9. There are two options for applying the J2C alias. They are listed as follows:
Component-managed :- Use when the resource configured in the EJB’s deployment descriptor res-auth property is set to Application.
Container-managed :- Use when the resource configured in the EJB’s deployment descriptor res-auth property is set to Container.
10. Since our application is controlling access to the database, we are going to use a Component-managed authentication alias. We will now select our J2C authentication alias, mapping our user ID and password to the data source, as shown in the following screenshot:
11. Click Next to view the summary screen, click Finish, and then Save. You will now see the data source listed in the data sources panel.
If you choose to re-edit the HRDataSource you just created, you will find a section called Related Items where you will see a link to the JAAS—J2C authentication data we created earlier post.
12. Test the data source by selecting the required data source and click Test Connection. If the data source is configured correctly, you will see a message similar to the one below:
On test successful ,this completes creation of datasource in websphere .
In case of any ©Copyright or missing credits issue please check CopyRights page for faster resolutions.


