WebSphere Liberty SSL Steps

This article will guide you through the step by step process to enable ssl for the applications deployed over Websphere Liberty. Following the steps ,you will
1.Enable ssl for the webserver server in our case IBM HTTP Server .
2.Enable ssl for webserver plugin to secure the communication between the webserver and Liberty.
Note: The certificates used here are self signed .
Please note enabling ssl for the webserver and application server plugin doesn’t mean that all the application end points are secure.Depending on your architecture there may be various integration points which would require ssl such as DB ,LDAP ,messaging systems such as MQ. Using self signed certificates on production servers is not recommended.
Environment details:
Websphere Liberty 8.5.5.7 64 bit
IBM HTTP Server 8.5.5.7 64-bit
Red Hat Enterprise Linux Server release 7.3
Firefox 45.7.0
Java 1.7 64 bit
First, we will enable ssl for the IBM HTTP Server.
We are creating a sample liberty server for demonstrating the steps. Let’s call the server myserver.From Liberty server installation location in our case /opt/IBM/WebSphere/Liberty/bin folder execute the server create.
[root@localhost bin]# ./server create myserver
Server myserver created.
[root@localhost bin]#
I have downloaded a sample webapplication for this article. Let’s deploy the sample application by copying it to dropins folder of the server we created. The path as below
/opt/IBM/WebSphere/Liberty/usr/servers/myserver/dropins
Verify the server.xml for the port numbers. We are going with the default ports.Verify the message.log to verify the application deployment is through without errors. We will check the application by accessing the url in firefox.
http://localhost:9080/ServletApp/
Now we will create an ssl certificate for the Liberty server using securityUtility.
[root@localhost bin]# ./securityUtility createSSLCertificate --server=myserver --password=myserver --validity=365
Creating keystore /opt/IBM/WebSphere/Liberty/usr/servers/myserver/resources/security/key.jks

Created SSL certificate for server myserver. The certificate is created with CN=localhost,OU=myserver,O=ibm,C=us as the SubjectDN.

Add the following lines to the server.xml to enable SSL:

<featureManager>
<feature>ssl-1.0</feature>
</featureManager>
<keyStore id="defaultKeyStore" password="{xor}MiYsOi0pOi0=" />
[root@localhost bin]#
Verify the key.jks is created on the location displayed by the message and then add the ssl-1.0 feature to your server.xml along with the keystore id and password details.
Server.xml presently should look like below.
[root@localhost myserver]# cat server.xml
<?xml version="1.0" encoding="UTF-8"?>
<server description="new server">

<!-- Enable features -->
<featureManager>
<feature>jsp-2.2</feature>
<feature>ssl-1.0</feature>
</featureManager>

<!-- To access this server from a remote client add a host attribute to the following element, e.g. host="*" -->
<httpEndpoint id="defaultHttpEndpoint"
httpPort="9080"
httpsPort="9443" />
<keyStore id="defaultKeyStore" password="{xor}MiYsOi0pOi0=" />

</server>
[root@localhost myserver]#
On IBM HTTP Server
1.Create a cms key database for IBM HTTP Server using ikeyman.
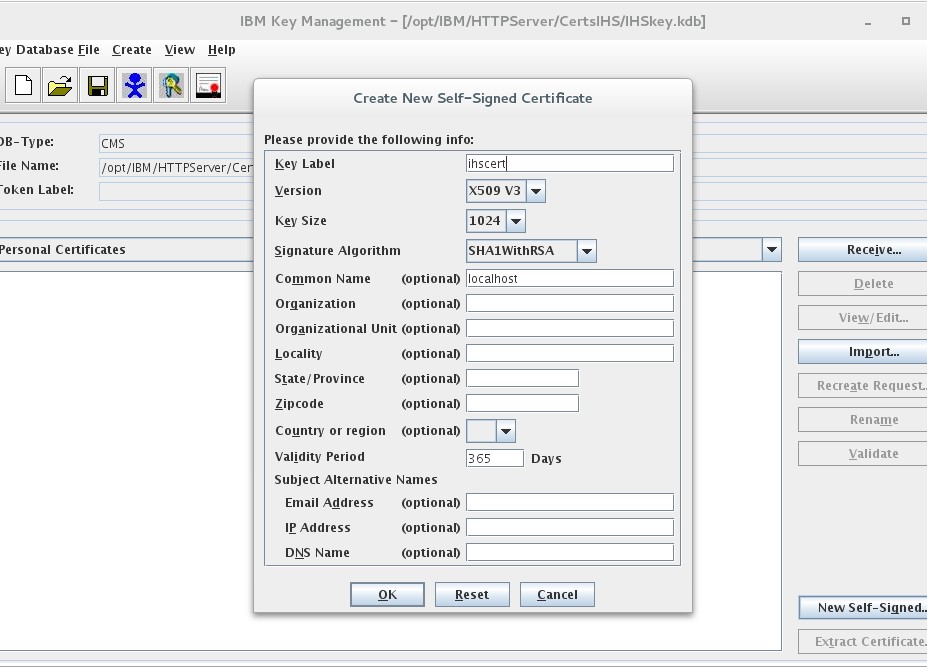
2.Create a selfsigned cert for IBM HTTP Server
Now update httpd.conf of IBM HTTP server to enable ssl module,virtualhost to point to 443 .You should update the kdb file path and key stash file location.
LoadModule rewrite_module modules/mod_rewrite.so
LoadModule ibm_ssl_module modules/mod_ibm_ssl.so
Listen 443
<VirtualHost *:443>
SSLEnable
KeyFile /opt/IBM/HTTPServer/CertsIHS/IHSkey.kdb
SSLStashFile /opt/IBM/HTTPServer/CertsIHS/IHSkey.sth
</VirtualHost>
Enable SSL for Webserver plugin
Follow below steps to enable SSL:
1. Extract the certificate from Liberty using ikeyman and save as crm.
2. Now create a cms key database file in our example plugin-key.kdb using ikeyman .
3. Add the exracted crm as a signer certificate to the plugin-key.kdb.
I have used jconsole and created the plugin-cfg.xml. Update the .plugin kdb location, label name and sth file location in the plugin-cfg.xml. In our case the location is
/opt/IBM/WebSphere/Plugins/config/webserver1/plugin-cfg.xml.
Note: Verify the plugin-cfg.xml location in httpd.conf .
WebSpherePluginConfig /opt/IBM/WebSphere/Plugins/config/webserver1/plugin-cfg.xml
<Property Name="keyring" Value="/opt/IBM/WebSphere/Plugins/plugincerts/plugin-key.kdb"/>
<Property Name="stashfile" Value="/opt/IBM/WebSphere/Plugins/plugincerts/plugin-key.sth"/>
<Property Name="certLabel" Value="default"/>
Restart IBM HTTP server and the application should be accessible over ssl.
https://localhost:9443/ServletApp/
Guest Author Details:
Author Name: Aiswarya G
Author Bio: Very Passionate about technology, with around 8 years of experience in IBM SOA,Websphere Middleware and Tivoli.
In case of any ©Copyright or missing credits issue please check CopyRights page for faster resolutions.


